Visualising CNNs: The Class Appearance Model
In this example we will demonstrate the ClassAppearanceModel callback included in torchbearer. This implements
one of the most simple (and therefore not always the most successful) deep visualisation techniques, discussed in the
paper Deep Inside Convolutional Networks: Visualising Image Classification Models and Saliency Maps.
Background
The process to obtain Figure 1 from the paper is simple, given a particular target class \(c\), we use back-propagation to obtain
\(\arg\!\max_I \; S_c(I) - \lambda\Vert I \Vert_2^2\;,\)
where \(S_c(I)\) is the un-normalised score of \(c\) for the image \(I\) given by the network. The regularisation term \(\Vert I \Vert_2^2\) is necessary to prevent the resultant image from becoming overly noisy. More recent visualisation techniques use much more advanced regularisers to obtain smoother, more realistic images.
Loading the Model
Since we are just running the callback on a pre-trained model, we don’t need to load any data in this example. Instead, we use torchvision to load an Inception V1 trained on ImageNet with the following:
class Model(nn.Module):
    def __init__(self):
        super(Model, self).__init__()
        self.net = torchvision.models.googlenet(True)

    def forward(self, input):
        if input is not None:
            return self.net(input)


model = Model()
We need to include the None check as we will initialise the Trial without a dataloader, and so it will pass
None to the model forward.
Running with the Callback
When using imaging callbacks, we commonly need to include an inverse transform to return the images to the right space. For torchvision, ImageNet models we can use the following:
inv_normalize = transforms.Normalize(
    mean=[-0.485/0.229, -0.456/0.224, -0.406/0.225],
    std=[1/0.229, 1/0.224, 1/0.225]
)
Finally we can construct and run the Trial with:
trial = Trial(model, callbacks=[
    imaging.ClassAppearanceModel(1000, (3, 224, 224), steps=10000, target=951, transform=inv_normalize)
              .on_val().to_file('lemon.png'),
    imaging.ClassAppearanceModel(1000, (3, 224, 224), steps=10000, target=968, transform=inv_normalize)
              .on_val().to_file('cup.png')
])
trial.for_val_steps(1).to('cuda')
trial.evaluate()
Here we create two ClassAppearanceModel instances which target the lemon and cup classes respectively.
Since the ClassAppearanceModel is an ImagingCallback, we use the imaging API to send each of these
to files. Finally, we evaluate the model for a single step to generate the results.
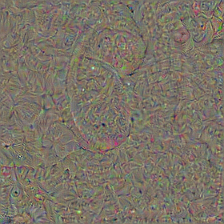
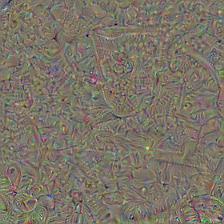
Results
The results for the above code are given below. There some shapes which resemble a lemon or cup, however, not to the same extent shown in the paper. Because of the simplistic regularisation and objective, this model is highly sensitive to hyper-parameter choices. These results could almost certainly be improved with some more careful selection.